Level Designer
ESOoverworldblockout.JPG

Design Blogs

Read about game jams and smaller personal projects here!

Lokir's Tomb - Part 2

Finally, some progress!

Largely fuelled by fresh energy coming off the back of my first GDC, I was motivated to get Lokir’s Tomb finished so that I could move on to bigger and better things in Creation Kit.

In this update I’m covering layout polish, clutter, navmeshing and encounter placement and hookup, finishing with some takeaways from my first test with encounters.

Using my last dev blog as a jumping off point (thanks past Catherine), after a quick walkthrough of the dungeon I started by making an initial hitlist for the space:

  • Finalising the cave environment by filling in any gaps open to the void and using rocks and environment pieces to hide the edges of my stream’s water plane

  • Adding some more pillars to the cave

  • Deciding on an appropriate deity and adding a shrine to them in the cave - someone who might have been worshipped by an ancient Nordic sect

  • Adding some waterfalls to one end of the stream

  • Extending the big hall by 1-2 blocks between the entrance and the high altar - I wanted this space to feel grand and open, and right now it was too shallow to execute that

  • Adding more environmental damage to the big hall and ruins rooms

Clutter

After these were all done, I knew I had to get onto clutter which was going to be a big task. To help with this, I visited a Nordic Ruins dungeon in Creation Kit to study the clutter items used in there. For this I picked Bleak Falls Barrow, starting at the beginning of the dungeon just working through clicking on all the items that looked like they would work in Lokir’s Tomb and making a note of the item name so I could come back to it. This helped a lot to make sure I was using items in a similar way to how they are used in the real game. I also took notes on different environmental elements that I could use like lighting and water effects, and enemies used for the encounters in Bleak Falls Barrow.

I already had a couple of clutter items in my dungeon from last session, but since then I had some more detailed ideas around purpose of each space, especially after considering the kinds of encounters that might be taking place.

Like many ruins across Skyrim, this funerary shrine to Akatosh has been inhabited by a group of necromancers making use of the corpses available in the burial chamber. They haven’t been able to figure out how to get past the puzzle door in the hall of stories, and they have no idea what lies beyond it. What they don’t know is that right under their noses is the key - Lokir’s Claw. Using the key, the Dragonborn is able to access the chamber beyond the puzzle door and find the cave, home to an ancient shrine to Nocturnal.

They’ll also find out why it was locked away (in the form of a boss encounter I’ve yet to decide on).

Informed by this clearer idea of the purpose of each space, I could get started with some clutter.

  • Entrance room: A more welcoming space focused around a shrine to Akatosh which mourners would have been able to quickly visit to give offerings and remember their loved ones, near to the main entrance.

  • Wake room: Down a hallway from the entrance, a space with a fire and tables, ready to serve comforting refreshments to those visiting for longer periods or after funerary rites. Here, some lower level mages have set up a rudimentary living space while they study the dead inhabitants of the ruin.

  • Big hall: Attached to the wake room, this bigger space would have been used for funerary rites, with a grand main platform and a ground level area for mourners to gather. Surrounding this on the walls of the ground level are tombs of more important people honored by burial in the main chamber. In the big hall, a higher level necromancer can be found practicing her resurrection on the dead within.

  • Lower burial chamber: Connecting to the wake room is a hallway behind a portcullis leading to the lower burial chamber, where common folk would have been interred. Beyond another portcullis is a small tunnel leading to a wide hallway, ending with the puzzle door.

  • Ancient cave: Behind the puzzle door is a wider tunnel, twisting and descending toward the cave which opens out to show the ritual area and Nocturnal’s shrine.

In the interests of time (and the fact that I am trying to practice my Creation Kit and level design skills rather than level artistry), I opted to only minimally clutter the spaces - a good tutor once told me that a level designer should only go into as much detail as is needed to get the point of the space across. I really wanted to move on to the navmeshing and encounter placement, so I just placed some basic clutter knowing that if I have time I can come back to clutter it more later.

Navmeshing

I was worried about this being quite an arduous, technical task but it turned out to be really easy and it was done within an hour or two. I got a bit stuck on the cave and ended up manually creating the navmesh which could have been too detailed in some areas - without knowing the exact quirks of navmeshes and how they work with AI it was hard to know how perfect it needed to be. For my purposes I just wanted to get something in so I could test it out, which I was able to do pretty quickly.

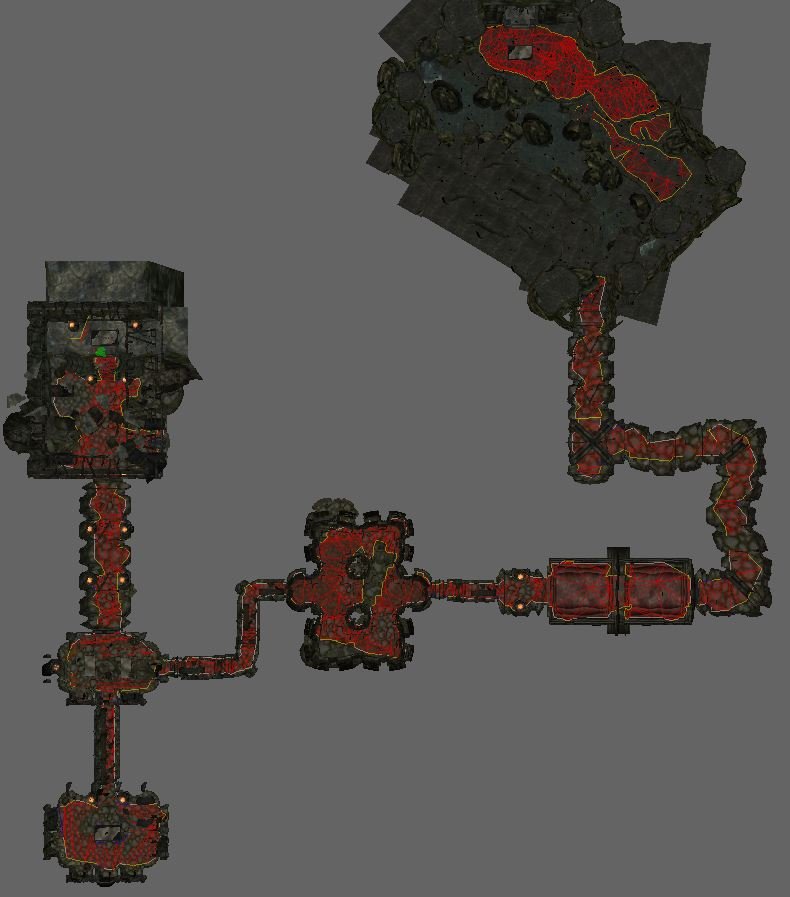
Note there is a big chunk of the cave without a mesh - I expect to have to come back to this later once I add an encounter in there. I also mostly left the lower burial chamber as is from the auto-generated one in order to get stuck in with having a go at encounter placement.

Encounters

I followed a similar setup to the Encounters tutorial, choosing two encounter mages for the wake room and a levelled necromancer spawn for the big hall. I also added an encounter Draugr to this room, just to see what he would do. It ended up being a good addition because it gave the necromancer something to resurrect during the fight with her. In the lower burial chamber, I added in two skeletons. For the cave, I initially wanted this to be free of major encounters, but as the biggest space it feels empty without it compared to the other areas, so I think it needs a big boss encounter to finish up the dungeon.

After placing them I set up some super basic patrol routes - the mages in the wake room rotated between their bed rolls and the alchemy table, while the necromancer in the big hall rotated between the table, a floor sconce fire and her origin point. When this was done, I gave it a play - see below for a walkthrough.
(Bear with me while I nearly die to my own ice mage)

Testing takeaways

I was pretty hyped that now this is really starting to feel like a dungeon! But it’s clear that it’s very rough and there are a lot of obvious things to improve on. I’ll break them down here by space.

Wake room

Problem: The biggest issue with the wake room is that the rubble pile in the center of the room was really obstructive and way too big for the space, which was especially clear now that a fight needed to take place there. Originally I added it because architecturally, the center of a roof would break down first, but this just creates a huge blocker right as you enter the room. The combination of the tables and rubble pile are suffocating the space, making it really hard to move around avoiding the enemies. On the other hand, the tables and piles created some interesting cover for combat.

Solution: I’ll start by drastically reducing the size of the main rubble pile, potentially removing it altogether but I’d like to have some ruined element in the room. I’ll also take out one of the tables and move the one nearest to the bedrolls back toward the center. I might even experiment with different table options that might suit the space better. I feel like this room is also generally too small for what I want to do with it, but since I want to avoid making major changes at this point I’m going to try to counteract that with the aforementioned changes first.

Big hall

Problem: The pillars, which were added for aesthetic framing reasons, ended up also creating some interesting cover for combat. Despite this, I don’t love how the enemy always has the "high ground". I’m not sure if this is to do with my navmesh setup, or possibly the fact that because she has a ranged attack, she won’t try to come down to my level to fight.

Solution: I’ll see if I can mix up her combat style by adding a patrol spot for her down the stairs, and see if the navmesh is set up appropriately. I might also add one or two more minions on the lower level to extend the fight in this area and add some variety.

Lower burial chamber

As a room that creates a lower pacing beat for the level, it serves this function well with just the two simple skeletons. However, it generally feels unfinished and a bit empty - this is a low-priority problem, but it will benefit from some lighting and loot when I get to that stage.

Cave

Problem: Without some framing and lighting elements, the opening view of the cave is very hard to read because there’s not much in there to create depth and perspective. There also isn’t anything drawing the eye to the shrine.

Another problem: The cave space itself doesn’t read well once you’re through the doorway - there’s not a lot of useful positive space pushing the player in any particular direction.

Solutions: Starting with the opening view of the cave, I’ll try to add some elements to indicate depth and perspective, and improve the readability of the wider space by adding some more positive space particularly in the left and far right corner of the space. I might also add some kind of built crossing point for the stream to help with this.

Bonus

I wanted to address something I feel is SUPER obvious - the blank wall space created by the corner hall after the puzzle door. This should be a huge reveal moment, but it’s just a blank corner! This is a symptom of my impulsivity, because originally this was just a continuous hallway rather than being broken up by the door.

A very sad reveal after the triumph of figuring out the door puzzle 🤡

Ideally, I would change this to reveal a shorter hallway leading directly to the cave in line of sight, but in the interests of time I want to avoid making major changes to the layout at this point. To mitigate it, I’m going to add some more clutter and lighting elements to the hallway, hopefully generating some curiosity in the player of what’s to come.

Next up…

My upcoming changes for the level will focus on solving the problems outlined above, and covering:

  • Adding loot, especially in the rooms with enemies

  • Add more clutter to the lower burial chamber

  • Improving the encounter in the big hall

  • Improving readability of the cave and adding an encounter

  • Adding optimisation zones and portals to the level

  • General lighting pass

  • World hookup

As a bonus, I’m also considering developing a short questline to go with the cave. More on that soon!

Catherine Booth
Lokir's Tomb - Skyrim Mod

Here’s the start of documenting my progress on my Creation Kit practice project - Lokir’s Tomb. This is a long one, because although I’ve been working on it on and off for a while, I hadn’t really been documenting much before this! So hopefully future updates are less bulky and more frequent.

To build this mod, I’m roughly following the Creation Kit tutorial from Bethesda, while adding my own spin on it and adding extra fun things as I go.

Starting Out

I felt like I’d watched the first few tutorials inside out at this point, so after fiddling around with adding little elements and trying them out in game, I jumped into making my own interior space following the first tutorial. The intended layout is reasonably simple; the main challenge here was twofold:

  • Learning the controls of the engine; they are similar to Unity but different enough to throw me off for the first 5 minutes

  • Working with a kit of objects that is a name lookup system rather than the prefab library of visual assets that I can quickly see and pull out, as in Unity.

Nonetheless, once I knew the naming conventions of the kit, and I had figured out the basic layout and controls in the engine, it was pretty easy to use the modular kit to put together my own version. I started by following the guide (on the right), and then I went through a series of iterations of the basic shell before I was happy to start with adding clutter, debris and individuality to each room.

The layout guide (sans cave) as seen on CreationKit.com

My original rendition of Lokir’s Tomb, roughly following the layout on the Creation Kit wiki, but with a Large Hall in place of one of the rooms (on the right)


On the left here is my first completed attempt at the basic layout. I used the big hall kit instead of the small room kit for the large end chamber, because I wanted to experiment with this type of space as well.


Adding the cave

Next I added the cave section in place of the ending room. The tutorial shows how to use the green cave kit to build a cave, and then go off grid (gasp!) to slot it into the end hall. I also learned how to add rocks and dust piles to the end of the hall to ease the player from one environment to the next.

The layout after adding in the cave section - the tutorial uses a small cave, but I wanted something a bit more meaty

I decided I reeeeally wanted to have water in the cave… This was some effort as I had to rebuild my cave and learn roughly how water works in the engine


Sidetrack 1: Water

Being the ambitious person I am (not helped at all by the sheer mass of different items in the Creation Kit library - it was easy to fall down the rabbit hole of previewing all the different stuff for hours!) for better or worse, I decided I really wanted to have water in my cave. Is this feature creep? Probably, but I was having fun so I wanted to give it a shot.

Originally I wanted to try having an underground pond in the cave, fed by a stream going into the pond and then out of. I studied a lot of different existing dungeons where I knew there was a water feature like this, but it was a bit advanced for my intentions here (read: I bit off more than I could chew!). In the interest of staying on task, I opted to just create a stream through the cave.

I got this done, and in the process, I had to rebuild the cave to suit the water. It still needs more work, but I’m generally happy with how it’s going so far.

Sidetrack 2: Puzzle doors

At this point I discovered the Hall of Stories puzzle door assets, and I really wanted to give them a try. I first had a go assembling it myself (the pieces are reasonably self explanatory), but I needed to learn a bit of visual scripting to get it working. Another tutorial later, I had figured out how to:

  • add scripts to my objects

  • specify what # icon on each ring would unlock the door

  • link all the different working parts of the door up

  • link the activation to some particle effects

  • create a unique claw object and specify which claw key would unlock the door

Unfortunately, even after doing all this perfectly, my claw door still wasn’t working in game, and after some googling, I worked out that there was a conflict between my doors and another mod I was running in my version of Skyrim. Thankfully, I uninstalled that mod and my door worked! I was very pleased with myself having taken on something a bit higher level than novice and overcome the challenge of setting it up.

At the same time, I hooked up the other basic doors in the level, and the linked the two portcullises with their respective pull chains.

The current layout of Lokir’s Tomb


Creation kit best practices: Lines of sight

Something that’s mentioned in later Kit tutorials is being mindful of render distances within levels. There are a few techniques they mention, but noticing the direct line of sight all the way from the hall entering the catacombs to the puzzle door (which is not great from an LD perspective anyway), I’ve tried to break that up by using some stairs after the catacombs exit portcullis. However, I think I need to raise it by another stair block to properly break that long line of sight.


A caved in wall in the memorial chamber

My very quick Hall of Stories, with a (not so quick) custom Coral claw puzzle door at the end


Context is key

Meanwhile, I had been thinking about the context for my tomb (again, above and beyond the tutorial’s intentions) and what ancient Nords might have used it for. I think originally, these kinds of dungeons within the game prioritised gameplay rather than context, so despite being a Skyrim nerd I don’t think there is too much lore incorporated into creating consistency around how certain spaces would have been used. However, I love to think about the context and use of a space as a starting point for creating something well-grounded in the game world.

With the idea that this was a certain important person’s tomb (Lokir), I decided that there could be different uses for the rooms:

  • The entrance hall would be a place for mourners to initially gather

  • The secondary hall could be a place where a wake might be held (but ideally I think that should be more of an antechamber than a place where paths converge as it currently is - something to change next time I work on it). This splits into two halls - the main hallway toward the ceremonial chamber and the small hallway, through a portcullis into the catacombs.

  • The ceremonial chamber is a large hall with a raised platform on one end that might be a place where mourners gathered for a memorial service

  • The catacombs are the burial place for more common Nordic dead. Mourners might enter here to visit loved ones. The portcullis is in place to deter grave robbers… or keep something else in.

  • The hall of stories is a preamble indicating that what lies behind the puzzle door is of great sacredness and significance, only to be opened by those who know how (and with the key)

  • The winding hallway beyond leads down into a large open cave

  • The cave is the inception point of the whole tomb. With a shrine to something perhaps much more ancient than the Nords, the halls leading to the cave were built from the original small tunnel that connected the underground stream cave to the surface. Alternatively, the cave could have been used by a sect of ancient Nords worshipping a particular Daedra, which would explain why the entrance to the cave is locked behind a puzzle door. Possibly, Lokir himself is buried in the cave, closest to the shrine.

With all that in mind, I decided to change the next chamber after the secondary hall into a catacombs hall (which was a good excuse to use a different type of room kit as well). In the future, this could be a place for a few encounters with some Draugr.

Inside the catacombs at the moment

Time for clutter!

Having finally settled on the layout (though I will need to come back to the cave soon), I was itching to get into the “cluttering” step.

The first thing to do was not actually placing clutter, but swapping out sections of walls and halls to their variations within the set in order to break up the tiled look and create variation in each room. This was pretty easy to do once I got the hang of the nice find and replace feature in the engine. I also added some rubble piles to floors to hide the similar textures.

The next thing to do was to start “ruining” my spaces - adding damaged walls, building cave-in's that made sense physically, adding vines, rocks, more rubble piles. This was pretty fun to do, because I got to be off grid and rotating and scaling things to make them work in the space, which is not something I’m generally allowed to do in my day job!

At this point, it’s starting to look like something you might actually see in Skyrim, which is motivating!

What next?

From here, the to-do list is:

  • finish off the cave: it’s hard to get a good idea of how it will look in game without testing it in-game, so there are some spaces which are open to the void, and the cave itself generally doesn’t read very well

  • clutter! I think I’ll start this by creating a little “prefab library” of things I want to use in a room, and then being able to duplicate them and set them up quickly. I’m excited for this part!

Beyond this, there will be lighting, navmeshing, actor placements and more to be done in the level.

Catherine Booth
Space Dungeon - Global Game Jam 2018

Space Dungeon is a asymmetrical exploration adventure for VR. With one player first person in VR and one outside on a 2D map, the second player uses a map to direct the VR player through the abandoned spacecraft, the ESS Defiant (yes, I stole that from Deep Space Nine). 

Space Dungeon was the product of the Brisbane chapter of the 2018 Global Game Jam, my first ever game jam. Produced by a multi-disciplined team of 8 over the course of 48 hours, Space Dungeon was created for two players on the HTC Vive. On this project, I acted as producer/project manager and UI designer & artist. Keep reading to see a wrap-up of my role on the project and my experiences.


STARTING OUT

Being my first game jam, I didn't come in with any preconceived notions about what kind of game I wanted to make. However, I did come in with a few basic goals for myself during the jam, and these were as follows:
- To work in a team of people I had never met before
- To practice my project management and production skills
- To practice my UI design and art skills
- To create something I'm proud of to include on my design portfolio

After learning our theme for the jam, "transmission", we spent the next hour or so breaking into teams. As a self-named "utility", I spent a bit of time approaching each group to see what they needed. Eventually, I found a larger group that looked like they were in need of direction and I started out by facilitating some ideation around our theme. Next, I helped the team get to know each other and delegated roles based on each team member's abilities. After creating a rudimentary breakdown of the game elements that would be required, we headed to bed for the night. 

On Saturday I started early by creating a map of what our level should look like. Once this was complete I passed it on to a developer so he could start creating the level in Unity. The final level changed somewhat significantly from this original design, so I developed a "blueprint view" in Photoshop based on what my team member made in Unity at the end. This would become the screen interface that player 2 reads from to help player 1 navigate the spaceship.


DAY 2

Next, I spent some time designing the different UI elements for the player in VR. Since I wanted to try and avoid having information on the screen in a HUD display, I had the idea to attach UI elements to the player's hands, similar to a Pip-Boy in Fallout. I started with the right hand, which would typically be holding the weapon (assuming the player is right handed). With a limited time frame, I wasn't able to spend time researching the best way of displaying ammunition or other information for the player, so I had to be creative and I chose to do this with as little written or numerical data as possible. I decided on a 4 phase system in which the weapon has ammunition that gradually recharges after use. The charge level of the weapon is represented by the blue light-up diamond on the four sides of the circular indicator (images on the right).

While I was working on the art side of things, I was also managing the team and checking in with each team member on a regular basis, ensuring everyone was on task and had everything they needed. I did have to mitigate one or two minor issues between team members and ensure we were sticking to tasks delegated to us to prevent time wasted from doubling up.

Once the gun interface was done, I spent some time considering how to display the player's health and various in-game items. I wanted to keep the theme similar to the weapon display and try to represent the information visually rather than numerically wherever possible. I created the final "pipboy" based on some sci-fi concept art and had some fun tweaking the design in terms of adding and taking away shapes and lines, and I really enjoy the final look. In terms of function, the segmented bars on the right and left sides were intended to act as health bars, while the four large diamond shapes could have been inventory slots or other options. Unfortunately, the functionality for the "pipboy" and the gun interface wasn't able to be implemented in the final game due to our time constraints, but I do think they look pretty cool. 

DAY 3 & WRAP UP

On the last day, I focused on managing the team and re-prioritising our burn-down to ensure all the basic functionality would be implemented in the game. This included ensuring we had enemy models, working controls and weapons, sounds and a win & loss state. I was also in charge of ensuring our game was ready to go on the deadline. On top of this, my co-leader and I participated in an interview with the organisers of the jam on behalf of our team which was broadcast live on Twitch. This was a great way to observe our arc from start to finish and acknowledge the great work of our team in the short time we had together. 

With the small amount of spare time I had left, I created a splash screen for Space Dungeon including a few basic buttons to start and finish the game. 

Overall, I had a really great experience at my first ever game jam and I felt like I really achieved the basic goals that I set for myself. We created a pretty cool little game in the time we had!

Catherine Booth
Koala Kaos - Global Game Jam 2019

Koala Kaos is a 2D platformer adventure, in which a koala avoids various Australian bush hazards to escape the deforestation of its habitat.

This game was created in 48 hours with a team of 4, during the 2019 Global Game Jam. On this project, I was game/level designer and producer. On the team we had 2 programmers and an artist, along with 2 “freelance” animators. Below is a little wrap up about my experience and my role in the project.


After facilitating our ideation process, I began quickly forming a list of different features we wanted to include, and then we worked out the minimum viable product we wanted to have at the end of the jam. With this, I delegated out which tasks each person would tackle.


From here, we jumped right in and I started by drawing out the stages of the game on the whiteboard. I like being able to erase and switch sections around, and throw different enemies and obstructions in. On the right here you can see the levels sketched out in red and the intended path for the players in blue. I created it in about 6 different phases or stages where I planned to introduce new obstacles/enemies.

Level design is my favourite part of game development so I really enjoyed putting my headphones in and focusing for an hour or so on this task. Once I was happy with the level, I ran it past the other artist to discuss how we would proceed with building it. Around this time, we were approached by 2 more team members who began helping us out with animation.

Day 2

The next morning, I started by selecting about 9 different Eucalyptus trees from google images that matched the shapes I needed for the level. From here I traced them in Photoshop and laid them out in the path of the level. I then passed each tree shape on to the artist to give them appropriate colour.

At this point there was some discussion about how we would handle the koala eating the leaves on the tree, and one of our programmers prototyped a nice physics-based tree branch that used a hinge joint to respond to the weight of the koala. While this looked great, after a couple of hours it quickly became apparent that putting hinge joints on all 9 trees was outside our scope and I made the call to scope down and revert to the static trees. Despite this, we did keep the leaf-eating mechanic but put it aside while we worked on other, more important aspects of the game that were more necessary to the MVP.

While our artist was working on art aspects of the level, I started setting up the game in Unity with different scripts and animations that other team members sent through to me. Note: I did ask the team at the outset if they’d prefer to use a git manager, but they said we’d probably be fine without one and being someone who doesn’t usually focus on scripting or building the level itself, I didn’t challenge this. I did like the simplicity of this and I think it helped prevent time-costly merge issues, but it did also cost us in terms of time wasted where one team member needed to work directly on the level meaning I had to wait until they were done before continuing. Next time I’ll push harder for this and hopefully save us lost efficiency.

As the art assets started flowing in from the artist, I then started to assemble the level as per my design. It didn’t translate perfectly but I worked with it the best I could. This was inter-cut with adding other aspects like the magpie and bulldozer, and we spent a good deal of time getting the koala working properly. We also spent quite a bit of time figuring out the Unity animator to try and get our animations working. Luckily we got some help from a few different people and had it sorted out.

With different assets like rocks, grass, and other native plants coming through, it was another opportunity to put my headphones in and focus while I built the level in Unity. With this task, I worked late into the night assembling the level and finally called a halt at about 1:30am!

Day 3 & WRAP UP

On the final day, we consolidated what had already been done, ticking off the priority list, and were able to give some attention to the bonus items we were interested in including. With most of the art complete, our artist created a really nice menu screen and rigged it together with the help of one of the programmers. This was a really quick and easy way to give our game a more polished look.

I spent some time on the last leg implementing some 3D sounds in the level, which was reasonably quick to work out and gave us another little leg up in terms of polish.

With a bit of time to spare and almost all of our priorities ticked off, we decided to have a go at implementing our rather tragic car mechanic. One of the programmers quickly created the script for it, and our artist created a road floor asset and a car that came in different colours. I scaled them appropriately and adjusted some of the timings, and very soon we had a car that worked on a timer that could “hit” the koala. It was a bit confronting, but it brought home well our game’s message of the impact of human activity on the koala habitat.  

Overall, I had a great time creating this little game and the process allowed me to further identify and hone in on which skills I want to build within the game production process.

Catherine Booth
Wholey Bowley - Global Game Jam 2020

Wholey Bowley is a third-person bowl simulator (we made that up) where you play as a broken ramen bowl aiming to make themselves whole through the Japanese art of Kintsugi.

This game was created in 48 hours with a team of 4, during the 2020 Global Game Jam. On this project, I was game/level designer and programmer. On the team we had one other programmer and 2 artists. Below is a little wrap up about my experience and my role in the project.

DAY 1

For this jam I was really clear that I wanted to work on level design in Unity, in a 3D game. I also wanted to try my hand at doing some programming, which was new to me this time! I wanted to branch out from my previous experiences, which I think I achieved this time round.

This jam’s theme was “repair”. After looking for some inspiration online, we decided we really liked the idea of incorporating Kinstugi - the Japanese art of repairing broken pottery with gold, creating a beautiful new piece of artwork from something that was once broken and unusable.

We did some brainstorming and came up with the wacky idea of making the bowl the playable character - you start as one piece of the bowl, and by traversing around the kitchen, you collect gold pieces which enable you to put yourself back together when you run over another bowl piece.

I started by mapping out the ramen kitchen environment on the whiteboard, thinking about the kinds of traversal we could work with while incorporating balanced progression in the types of risks/rewards I was giving the player. I placed each gold piece in varying locations, with some pieces within easy reach and others in harder to spot locations.

I tried to create clear affordances to the player and make it obvious which places could be climbed - drawn in green (drawers, pot stacks, open cupboards) and which spaces were ok to “fall” on without being broken again (marked green boxes - sacks of flour).

Of course, bowls can’t really climb - we were inspired by I Am Bread to create a funny traversal system where you control the various points on the bowl to “grab” on and let go and move. There had to be some suspended disbelief about what our bowl piece could actually climb, but I did my best to make it kind of realistic.

Our 3D artist and I collaborated to standardise the size of the environment (the numbers you can see around the diagram) and he started creating the various setpieces for me to use in our Unity scene.

DAY 2

Next I started building the blockout in Unity - this was really my first 3D blockout! I like using colours so I can easily see what’s what in the scene, identifying climbable spots (orange) and safe fall zones (green). As the assets began flowing in from the artist, I replaced these blocks with the setpieces.

I really enjoyed doing this work - it was easy to get stuck in. For the most part, everything translated really well due to the good communication amongst our team.

DAY 3

On the final day I helped rig up our menu and implement some basic controls, which were improved upon by our other programmer. The level was handed off to our 3d artist who finished off the set dressing and added some nice lighting to the scene.

Overall, our game turned out to be fun and the jam was a great experience!

4r34r.JPG
Catherine Booth